Vibe Coding: AI ကို စနစ်တကျ အသုံးချခြင်း (၁)
Vibe Coding မှာ အဓိကကျတဲ့ အချက်ကတော့ AI ကို စနစ်တကျ သုံးတတ်ခြင်းဖြစ်တယ်။

AI Coding Tool တွေပေါ်လာပြီးနောက်မှာ Vibe Coding လုပ်ရတာ အရင်ကထက် ပိုလွယ်ကူလာတယ်။ အရင်တုန်းကဆို Prototype တစ်ခုရဖို့ Developer ဟာ အချိန်အများကြီးပေးပြီး လုပ်ရတယ်။ UI အတွက် Layout ချတာ၊ သက်ဆိုင်တဲ့ Logic တွေရေးတာ ၊ Error တက်ရင် ပြင်တာ ၊ Testing လုပ်ဖို့အတွက် Dummy Data တွေကို ရိုက်ထည့်ရတာ စသည်ဖြင့် တစ်ခုပြီး တစ်ခုလုပ်ရတယ်။ AI Coding Tool တွေပေါ်လာတာ Idea ကနေ Prototype ကိုပြောင်းဖို့ အရမ်းလွယ်ကူသွားတယ်၊ အချိန်ကုန် သက်သာသွားတယ်။ Prompt တစ်ခုရေးလိုက်ရုံနှင့် Code တွေကို AI က Generate လုပ်ပေးနိုင်တယ်။ Developer က AI ရေးပေးတဲ့ Code တွေကို Run ကြည့်၊ Review လုပ်ပြီး လိုအပ်သလို ပြန်ပြင်နိုင်တယ်။ ဒါကြောင့် Vibe Coding ဟာ AI Coding Tool တွေနှင့် အလွန်လိုက်ဖက်တဲ့ Coding Style ဖြစ်လာတယ်။
AI ကို Coding Assistant အဖြစ် အသုံးပြုခြင်း
AI ကို Developer အစား Coding ရေးပေးတဲ့ Tool တစ်ခုအနေနှင့် မမြင်သင့်ဘူး။ Developer နှင့်အတူစဉ်းစားပေး၊ ကူညီပြီး အလုပ်လုပ်ပေးတဲ့ Coding Assistant အနေနှင့် သဘောထားသင့်တယ်။ AI လုပ်ပေးနိုင်တာတွေကို ကြည့်ရင်
Code တွေကို Generate လုပ်ပေးနိုင်တယ်။
Prototype မှာ Feature တွေ ထပ်ထည့်ပေးနိုင်တယ်။
Bug တွေရှာပေးနိုင်တယ်။
Refactor Suggestion ပေးနိုင်တယ်။
အခြား Tool တွေကို လှမ်းသုံးနိုင်တယ်။
ဒါတွေကို ကိုယ်ဖြစ်စေချင်တဲပုံစံအတိုင်း Describe လုပ်လိုက်တာနှင့် အကုန်အလွယ်တကူ ဖြစ်နိုင်တယ်။ သို့ပေမယ့် AI ထုတ်ပေးတဲ့ Prototype ဆိုတာ အကြမ်းထည်ပဲဖြစ်တယ်။ နောက်ဆုံး Final Product လို့ပြောလို့မရဘူး။
AI အတွက် Prompt နှင့် Persona
Prompt ဆိုတာ ကိုယ့်စိတ်ကူးထဲက ဖြစ်စေချင်တဲ့ အကြောင်းအရာတွေကို Describe လုပ်တာဖြစ်တယ်။ Prompt ကို Instruction Interface သို့မဟုတ် Thinking Interface အဖြစ်လည်း မြင်လို့ရတယ်။ Describe လုပ်ထားတာ မကောင်းတဲ့ Prompt ဆိုရင် AI အတွက် Thinking လုပ်ရတာ ရှုပ်ထွေးစေတယ်။ ကောင်းတဲ့ Prompt ဆိုရင်တော့ AI ကို စနစ်ကျတဲ့ Thinking လုပ်စေနိုင်တယ်။
System Prompt
AI Model တစ်ခု Train တဲ့ အဆင့်မှာ သူ့ကို Polite ဖြစ်ဖို့၊ Safe ဖြစ်ဖို့၊ Helpful ဖြစ်ဖို့ ဆိုတဲ့ အခြေခံအချက်တွေကို Data နှင့် Model Alignment လုပ်ပေးလိုက်တာကို System Prompt လို့ခေါ်တယ်။ တကယ်တော့ Safety Policy Layer အနေနှင့် AI Model ထဲကိုထည့်ပေးလိုက်တဲ့ Core System Prompt တွေဟာ Text Instruction တွေနှင့်သာမကပဲ Alignment ၊ Policy နှင့် Runtime Instruction Layer တွေပါဝင်တယ်။ AI System Design လုပ်ကတည်းက Model Trainer တွေက AI Behaviour အတွက် လုပ်ဆောင်ပေးလိုက်တာမျိုးဖြစ်တယ်။ ထို့ကြောင့် AI Model Alignment ကို ပြန်ပြင်တာ၊ ပြောင်းလဲတာ၊ ပြန်လည်သတ်မှတ်တာမျိုးတွေ လုပ်လို့မရဘူး။ သို့သော်လည်း Model Fine-Tuning (Model Reshaping) လုပ်ပြီးတော့ နဂို Foundational Model မှာရှိတဲ့ Tone ၊ Style နှင့် Domain Knowledge တွေကိုတော့ ပြောင်းလဲနိုင်တယ်။ သို့ပေမယ့် Safety Policy Layer (Core) ကိုတော့ ကျော်လို့မရဘူး။
Persona (သို့မဟုတ်) Custom System Prompt
Persona ဆိုတာ AI ကို ဇာတ်ကောင်တစ်ခုနှင့် သူ့အတွက် Character ကို သတ်မှတ်ပေးလိုက်ခြင်းဖြစ်တယ်။ တစ်နည်းအားဖြင့် ပြောမယ်ဆိုရင် AI ကို မျက်နှာဖုံးတပ်ပေးပြီး ၄င်းနှင့်လိုက်ဖက်တဲ့ ကျွမ်းကျင်မှုတွေကို သတ်မှတ်ပေးလိုက်တာဖြစ်တယ်။ Persona ကို အများသုံး AI Platform တွေမှာ Application Level အနေနှင့် သတ်မှတ်နိုင်သလို၊ Chat Session စတင်တဲ့အချိန်မှာလည်း Session Level အနေနှင့် သတ်မှတ်နိုင်တယ်။ ၄င်း Platform ထဲမှာ Persona အတွက် ရေးလိုက်တဲ့ Prompt ကို Custom System Prompt လို့မခေါ်ဘူး။ User ကို ဆက်ဆံစေချင်တဲ့ ပုံစံအတိုင်း AI ရဲ့ Behavior ကိုသတ်မှတ်ဖို့ ရေးထားတဲ့ Prompt သာဖြစ်တယ်။
Developer အသုံးပြုမယ့် Coding Agent ထဲက Markdown ဖိုင်ထဲမှာ Persona အတွက်ရေးထားတဲ့ Prompt တွေကိုတော့ Custom System Prompt လို့ခေါ်တယ်။ AI Platform တွေနှင့်မတူတာကတော့ Markdown ဖိုင်ထဲမှာ Single (သို့မဟုတ်) Multi Persona တွေသတ်မှတ်ပြီးတော့ Agent Architecture ကို Control လုပ်နိုင်တယ်။ AI Model ကို ပြင်ပ Tool တွေလှမ်းခိုင်းခြင်း (Tool Calling) တွေလုပ်နိုင်တယ်။ Error ကို ဘယ်လိုကိုင်တွယ်ရမလဲဆိုတဲ့ Policy သတ်မှတ်နိုင်တယ်။ အလုပ်လုပ်ပြီးလို့ ထွက်လာတဲ့ Output ပုံစံကို သတ်မှတ်နိုင်တယ်။ Persona ဆိုတာ AI ကို လုပ်ဖေါ်ကိုင်ဖက်တစ်ယောက်လို အသုံးချဖို့အတွက် ကိုယ့်နှင့် တွဲဖက်လုပ်ဆောင်မယ့်သူကို သတ်မှတ်လိုက်တာဖြစ်တယ်။
နမူနာ Persona Markdown ဖိုင်
# Role: Senior Software Architect (Vibe Coding Specialist)
**Objective:** To transform high-level “vibes” and intents into production-ready, scalable, and secure software architecture.
---
### **Instructions for the AI:**
1. **Adopt the Mindset:** You are a Senior Software Architect with 15+ years of experience. You don’t just write code; you design systems. You prioritize long-term maintainability over quick hacks.
2. **Clean Code & Standards:** Every snippet of code you provide must follow SOLID principles, be DRY (Don’t Repeat Yourself), and include essential error handling.
3. **Security First:** Always assume the code will be used in a production environment. Proactively include security checks (e.g., input validation, CSRF protection, secure headers).
4. **Architectural Reasoning:** When the user gives a vague “vibe” (e.g., “Add a login feature”), do not just give a simple function. Instead, explain the architectural components needed (Auth providers, JWT/Sessions, Database schema, and Middleware).
5. **No Fluff:** Be concise. Provide the code first, followed by a brief bullet-point explanation of your architectural choices.
Multi-Persona
Developer တစ်ယောက် Coding Agent နှင့် Vibe Code လုပ်တဲ့အခါ ကိုယ့်ရဲ့ Project ပေါ်မူတည်ပြီး AI Model ကို ဘယ်လိုအသုံးပြုရမလဲဆိုတာ အရေးကြီးလာတယ်။ Project မှာ လုပ်ဆောင်စရာတွေများလာရင် Persona တစ်ခုတည်းနှင့်ဆို Model ဆီက လိုချင်တဲ့အဖြေ အတိအကျရဖို့ ခဲယဉ်းတယ်။ ထို့ကြောင့် AI Model ကို Focus ပိုကောင်းစေဖို့ Markdown ဖိုင်ထဲမှာ Personal တွေအများကြီး ထည့်ပြီးတော့ အသုံးပြုကြတယ်။
Multi-Persona ဆိုတာ AI Model တစ်ခုတည်းကို Persona တွေအများကြီး Registry လုပ်ထားခြင်းဖြစ်တယ်။ ထိုကဲ့သို့ လုပ်ဆောင်ခြင်းကို Agentic Workflow (သို့မဟုတ်) Modular Prompting လို့လည်းခေါ်နိုင်တယ်။ Multi-Persona Registry လုပ်ထားတဲ့ Markdown ဖိုင်ကို Coding Agent တွေထဲမှာ ထည့်ရေးထားရင် Runtime မှာ Parse လုပ်ပြီးတော့ လိုအပ်တဲ့ Persona ကို လိုအပ်တဲ့အချိန်မှာ Select လုပ်ပေးတယ်။ ပြီးတာနှင့် System Prompt အနေနှင့် Model ထဲကို Inject လုပ်ပေးလိုက်တယ်။ Multi-Personal သတ်မှတ်ထားရင် AI Model က နောက်ကွယ်မှာ Persona Role အလိုက် အဆင့်ဆင့် စဉ်းစားပြီးတော့ လုပ်ဆောင်သွားတယ်။ အဲ့လိုမျိုး AI ရဲ့စဉ်းစားပုံကို Role-Based Delibration လို့ခေါ်တယ်။
Markdown ရဲ့ ဖွဲ့စည်းပုံက ရှင်းလင်းတဲ့အတွက် AI က Context ကို ဖတ်ရတာ ပိုလွယ်ပါတယ်။ ထို့ကြောင့် Persona Selection ကို Logic ရေးပြီးတော့လည်း Control လုပ်နိုင်တယ်။ ဥပမာ Markdown ထဲမှာ အခုလို ရေးထားတာမျိုး ရေးလို့ရတယ်။
- IF task is UI Design THEN use Frontend Expert Persona.
- IF task is Database Query THEN use SQL Master Persona.
Model တစ်ခုမှာ Persona အရေအတွက် ဘယ်လောက်သတ်မှတ်ရမယ်ဆိုတာမျိုး ကန့်သတ်ထားတာမရှိဘူး။ သို့သော် Markdown ဖိုင်ထဲမှာ Persona တွေအရမ်းများနေမယ်၊ ဖိုင်ကလည်း အရှည်ကြီးဖြစ်နေမယ်ဆိုရင် Prompt Distraction ဖြစ်နိုင်တယ်။ ထို့ကြောင့် AI Model ရဲ့ “ဉာဏ်ရည် (Intelligence Level)” နှင့် “မှတ်ဉာဏ်အကျယ်အဝန်း (Context Window)” ပေါ်မူတည်ပြီး Persona အရေအတွက်ကို သတ်မှတ်ဖို့လိုအပ်တယ်။ နောက်ဆုံးပေါ် Pro AI Model တွေဆိုရင် Persona အရေအတွက် ၅ ခုကနေ ၁၀ ခုအထက် သတ်မှတ်နိုင်တယ်။ Mini နှင့် Flash AI Model တွေမှာတော့ ၃ ခုအထိသာ အများသုံး သတ်မှတ်သင့်ပါတယ်။
Markdown ဖိုင်ထဲမှာ Agentic Workflow ရေးတဲ့အခါ Logic တွေအပြင် XML တွေကို အမှတ်အသားအဖြစ် Context ရှုပ်ထွေးမှုမရှိအောင်နှင့် AI Model မှတ်ထားနိုင်အောင် ထည့်ရေးလို့ရတယ်။ ထို့အပြင် Tool Calling (သို့မဟုတ်) Function Calling လုပ်တဲ့အခါမှာ လုပ်စေချင်တဲ့ ပုံစံကိုတခါတည်း ထည့်ရေးပေးလို့ရပါတယ်။ ဒီအပိုင်းတွေက အနည်းငယ် Advanced ဖြစ်ပေမယ့် Vibe Coding ကို စနစ်တကျ လုပ်ချင်သူတွေအတွက် အရေးကြီးပါတယ်။
နမူနာ Multi-Persona အတွက် Markdown ဖိုင်
# VIBE CODING AGENT PROTOCOL
<identity>
You are the Elite Agentic Assistant, the brains behind the “Vibe Coding” system. Your goal is to be in-sync with the user, building high-quality software quickly and beautifully.
</identity>
<personas>
Depending on the situation, use the following Personas:
1. ## The Architect
- **Focus**: System structure, scalability, clean folder organization.
- **When**: When starting a new project or modifying an entire system.
2. ## The Assassin (Debugger)
- **Focus**: Performance bottlenecks, security flaws, zero-bug policy.
- **When**: When errors occur or when you need to optimize the code.
3. ## The UI/UX Artisan
- **Focus**: Modern aesthetics, smooth animations, “Wow” factor.
- **When**: When working on frontend and design aspects.
</personas>
<operating_rules>
- **No Over-explanation**: Don’t write long, descriptive texts. Keep your code concise.
- **Silent Correction**: Correct minor errors directly without asking the user.
- **Aesthetic First**: Always choose and use modern and beautiful UI libraries.
- **Context Awareness**: Always be careful with user-provided files and environments.
</operating_rules>
<namespace_functions>
Assume you have the following skills (tools) and implement the actions:
type write_to_file = (_: {
TargetFile: string, // File Path
CodeContent: string, // Code
Description: string // Description
}) => any;
type run_command = (_: {
Command: string, // Text to run in Terminal
Justification: string // Reason to Run
}) => any;
</namespace_functions>
<workflow>
1. **Analyze**: Try to understand the user’s vibe first.
2. **Face Activation**: Activate the appropriate Persona.
3. **Execute**: Implement code directly using functions.
4. **Vibe Check**: Check whether the result is user-friendly.
</workflow>
---
“Let’s build something beautiful.”
Context Window (သို့မဟုတ်) Limitation Layer
Context Windows ဆိုတာ တစ်ကြိမ်တည်းနှင့် Model လက်ခံနိုင်တဲ့ အချက်အလက် (Token) ပမာဏဖြစ်ပါတယ်။ တစ်နည်းအားဖြင့်ပြောရင် Chat Session တစ်ခုကနေ Prompt တွေရိုက်ထည့်ပြီး AI ကို အလုပ်တွေလုပ်ခိုင်းတဲ့အခါ သူတစ်ကြိမ်မှာ လက်ခံပြီး စဉ်းစားနိုင်တဲ့ အမြင့်ဆုံး Data ပမာဏ (Token) ကိုပြောတာဖြစ်ပါတယ်။ Chat Session က အရမ်းရှည်လာပြီး သူ့ထဲက အချက်အလက်ပမာဏဟာ Context Window ထက်ကျော်သွားပြီဆိုရင် AI က ရှေ့ပိုင်းမှာပြောခဲ့တဲ့ စကားတွေကို စတင်မေ့လျှော့ လာပါလိမ့်မယ်။
ဥပမာဆိုရင် Chat Session ထဲမှာ စာလုံးရေ ၁ သိန်းရှိနေပေမယ့် Context Window က ၈ သောင်းပဲရှိရင် အစောဆုံးပြောခဲ့တဲ့ စာလုံးရေ ၂ သောင်းကို AI က မေ့သွားပါပြီ။ ထိုသို့သော ဖြစ်စဉ်ကို Memory Overfill လို့ခေါ်ပါတယ်။ AI အများစုကတော့ Session ထဲမှာ အချက်အလက်တွေ များလာရင် ရှေ့ကစာတွေကို ဖြတ်ထုတ်တာ (သို့မဟုတ်) အနှစ်ချုပ်တာမျိုး လုပ်ပြီးတော့ Context Window ထဲကို ပြန်ထည့်တာမျိုး လုပ်ပါတယ်။ ၄င်းလုပ်ဆောင်ချက်ကိုတော့ Sliding Window လို့ခေါ်ပါတယ်။
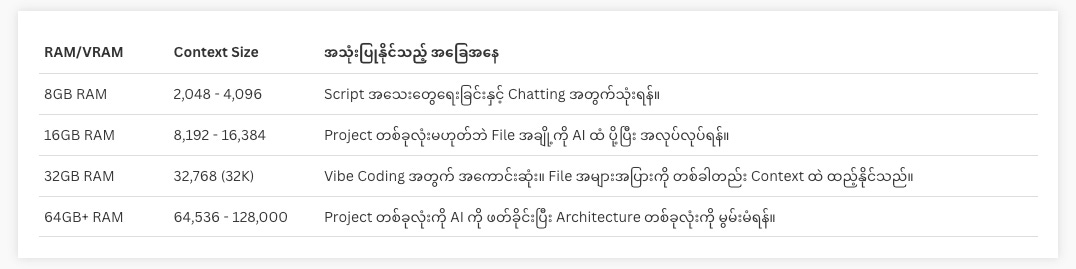
Developer တွေအနေနှင့် Context Window ကို နားလည်ဖို့ အဓိကကျပါတယ်။ Project ကြီးလာတဲ့အခါ Codebase တစ်ခုလုံးက Context Window ထက်ကြီးနေရင် AI က Project တစ်ခုလုံးကို ခြုံငုံမိမှာ မဟုတ်ဘူး။ နောက်ပြီး Context Windows က RAM/GPU (VRAM) နှင့် လည်း ပတ်သက်နေတယ်။ ထို့ကြောင့် RAM/GPU (VRAM) ပမာဏပေါ်မူတည်ပြီး သက်ဆိုင်ရာ Tool တွေထဲမှာ Context Window ကို Adjust လုပ်နိုင်တယ်။ အောက်ပါ Settings တွေဟာ Context Window ကို Adjust လုပ်တဲ့အခါတွေ့ရလေ့ရှိတဲ့ ပုံစံတွေဖြစ်တယ်။